

Tablet Wall Mount
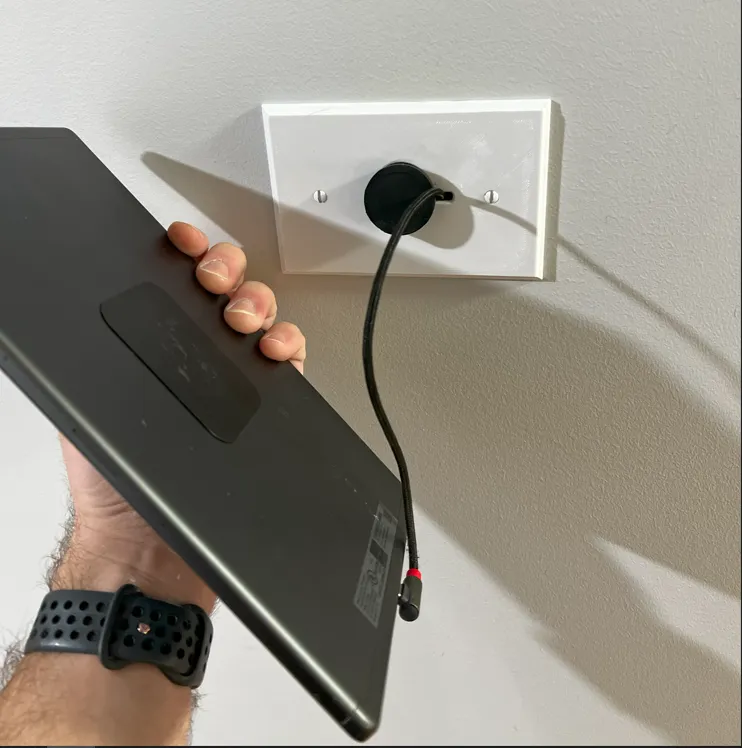
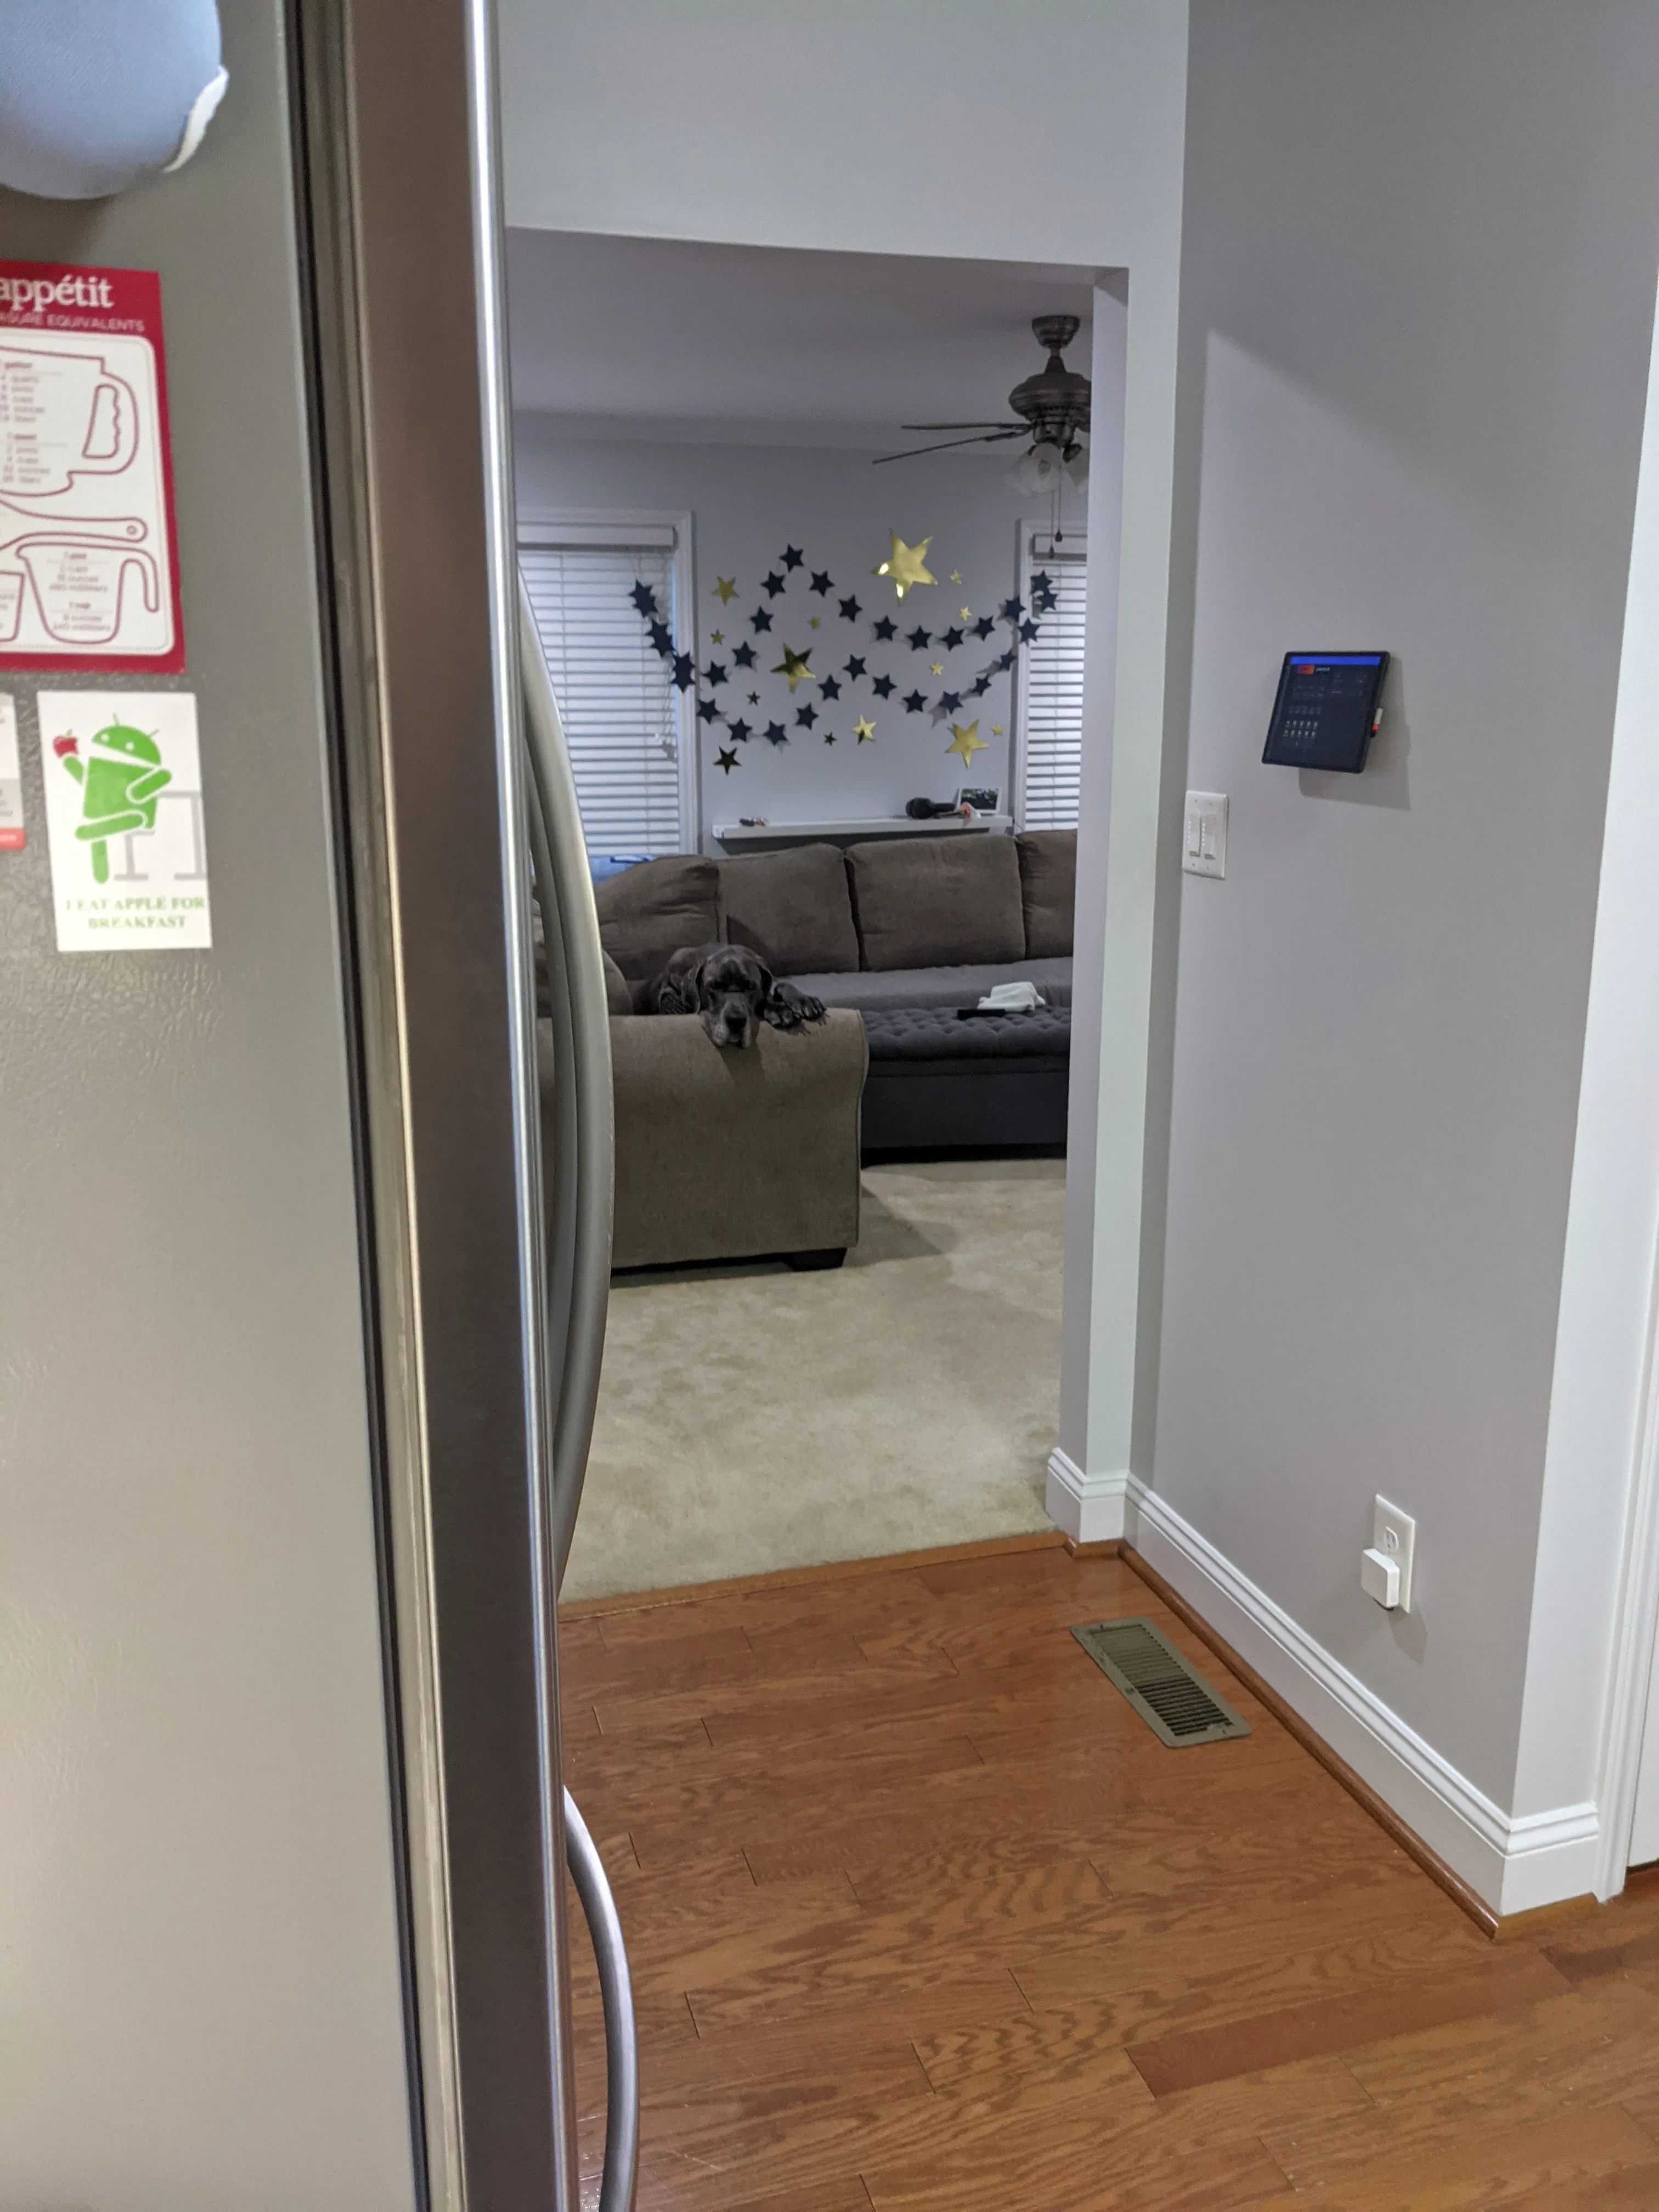
A wall tablet running a Home Assistant dashboard should look like it belongs on the wall, and every mount I could buy either bolted a bracket over the drywall or left a charging cable dangling down to an outlet. This one is a printed wall plate on a standard low-voltage bracket: the cable comes out of the wall cavity, a 40 lb magnet holds the tablet, and taking it down to use it in your hand is one pull.
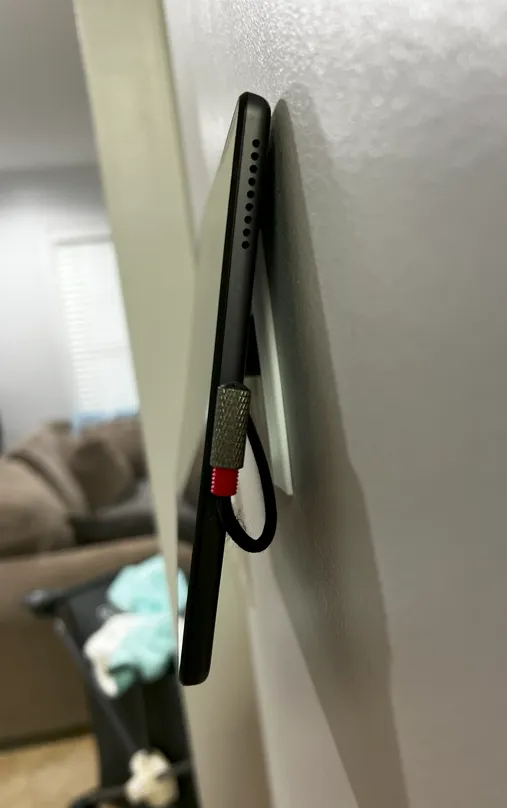
The whole design hangs off one trick — a keystone opening in the middle of the plate. The magnet bolts to a printed keystone insert, and the insert comes in four angles, so the same plate leans your tablet out at 0°, 10°, 15° or 20° without redesigning anything.
Parts
Some links below are Amazon affiliate links. As an Amazon Associate I earn from qualifying purchases — at no extra cost to you. It helps keep these guides free. Outside the US, they should send you to your own Amazon store; if one doesn't, searching the part number there will find it.
- Low-voltage mounting bracket, 1-gang, 5-pack — the open-backed kind with the swing wings. It needs no electrical box and no stud, which is the entire reason this mount can go where you want it rather than where a box already is.
- 40 lb rubber-coated neodymium magnet with an M6 male stud, 4-pack — this is the part the design is dimensioned around. The printed keystone insert has a 6.6 mm hole through its face for that M6 stud, and the rubber coating is what keeps it from scratching the back of the tablet. Buy the studded version, not a bare disc magnet, and not the countersunk-hole kind.
- An M6 nut and washer to hold the stud — a mixed M6 nut pack is a dollar and covers you for the next five projects.
- Stick-on steel plates for the tablet, 10-pack — sold as replacement plates for magnetic car mounts. Use the rectangular ones. The round ones in the same pack are coin-sized, which is a smaller contact patch than the magnet’s face, and a tablet on a small patch creeps down the wall over a week. One pack does ten tablets.
- A short right-angle charging cable — micro-USB, 1 ft, 3-pack or USB-A to USB-C, 0.5 and 1 ft, 4-pack. The right angle matters more than the length: a straight plug stands off the tablet’s edge far enough to lever it off the magnet, and it is the one thing here you cannot fix later with a file.
- Ultra-thin flat dual-port USB charger — flat enough that furniture still goes back against the outlet it is plugged into. If you would rather have nothing showing at all, an in-wall USB receptacle replaces the outlet below and puts the USB port inside the same stud cavity you are already fishing through.
- The long run from the charger up to the plate: 16.4 ft flat USB-A to micro-USB, 2-pack for a micro-USB tablet, or a 6.6 ft USB-C extension, 2-pack behind the short right-angle cable for a USB-C one.
- Recessed low-voltage cable plate — for the bottom end, where the cable leaves the wall next to the outlet. It is a two-dollar part that turns a ragged hole in the drywall into something that looks deliberate.
- Wall plate screws, #6-32 × 20 mm, 100-pack — the plate’s two holes are countersunk for exactly these. The screws that come with the bracket work too; this pack is for when you have printed six plates and lost them.
- PLA+, 1 kg in white, or matte PLA if you want the layer lines to disappear next to the real wall plates in the same hallway.
- Stud finder and a drywall jab saw — see Finding the right spot before you cut anything.
You do not have to print the plate. A low-profile 2-port keystone wall plate, 10-pack plus blank keystone inserts takes the same printed keystone in one port and a blank in the other. You lose the printed plate’s cable slot, so drill the blank insert for the cable. The printed plate is nicer; the store-bought one gets you running tonight.
The printed parts
Every number below is measured off the STLs in the download section.
keystone_plate_1_gang.stl is 88.90 × 133.35 mm and 9.80 mm thick — the
oversized (“jumbo”) 1-gang wall plate footprint, which is deliberate: it covers a
hole cut slightly wrong. Two countersunk holes sit on the centreline 83.34 mm
apart — the standard device-screw spacing every wall plate in your house uses —
7.0 mm at the face narrowing to a 5.5 mm bore.
The middle of the plate is one keyhole-shaped opening. The top of it is a 15.50 × 17.11 mm keystone port; running out of the bottom of that port is a 7.50 mm slot, 17 mm long, with a rounded end. The keystone insert plugs the port and the slot stays open — that slot is where the charging cable comes out, just past the edge of the magnet.
The keystone inserts — 0_degree_keystone.stl through
20_degree_keystone.stl — each have a 14.50 × 16.00 mm face, the standard
keystone module size, 0.5 mm clear of the plate’s port all round, with a
6.60 mm hole through the middle for the magnet’s M6 stud. The 0° one is 22.16 mm
deep; the angled ones are deeper because the face is tipped, up to 26.58 mm at
20°. The angle is the tilt of the tablet, not the tilt of the cable. Print
the 15° first: it is enough lean that you are not looking at a dashboard edge-on
from across the room, and not so much that the tablet looks like it is falling
off the wall.
20_degree_keystone_jack.stl is the same 20° insert with its body extended
to 42.00 mm — 15 mm longer, for a deeper barrel around the cable.
keystone_plate_2_gang.stl is the wide version and it solves the magnet
differently: instead of a keystone port it has a 6.00 mm hole straight through
the plate with a reinforcing boss behind it, and a separate 9.3 × 22 mm cable
slot below. Same magnet, same M6 stud, no insert and no angle — this one is flat.
Print settings
| Setting | Value |
|---|---|
| Layer height | 0.2 mm |
| Infill | 25% |
| Supports | None |
| Material | PLA or PLA+ |
| Plate orientation | Face down on the bed |
| Insert orientation | On its side, 14.5 mm face down |
Face down is not just for the finish. Printed that way the plate’s keystone cage points up off the bed and nothing overhangs, and the countersinks come out as clean cones instead of a stack of bridged rings. The inserts have flat sides all round, so laying one on its side prints the whole angled face without a single support.
Print one insert before you print six. Keystone latch tolerances are the first thing an over-extruding printer eats. The face is drawn 0.5 mm smaller than the plate’s port all round; if yours will not click in, that is your printer’s dimensional accuracy, not the model, and a pass with a needle file on the two long edges fixes it in a minute.
Finding the right spot
Where you put this decides how hard the job is. The cable has to get from the plate down to a power source inside the same stud cavity, so find a spot that shares a cavity with an existing outlet. In the US, studs are typically 16 inches apart and outlets are nailed to the side of one, so the cavity beside an outlet is the one to aim for. Interior walls are usually uninsulated, which makes dropping a cable a two-minute job instead of an afternoon.
Mine sits about 55 inches off the floor — roughly eye level standing up, which is the height that makes a dashboard glanceable and a tablet reachable.
Do not cut into a wall you cannot account for. Wires, pipes and firebreaks all live in there. Check with a stud finder, and if there is any doubt about what is behind that patch of drywall, put the mount somewhere else.
Assembly
-
Cut the bracket hole. Trace the inner outline of the low-voltage bracket onto the wall, cut to the line with a jab saw, push the bracket in and tighten its screws until the wings swing round and clamp the drywall.
-
Cut the bottom hole and drop the cable. Put the recessed cable plate’s opening in beside the outlet, feed the long USB cable down the cavity from the top hole, and fish it out the bottom. Leave a generous loop at the top — you want slack to work with at the plate, and pushing the extra back into the wall afterwards costs nothing.
-
Bolt the magnet to the keystone insert. M6 stud through the 6.6 mm hole in the insert’s face, washer and nut on the inside of the insert body. Snug is enough; you are clamping printed plastic. This is the step to do at a bench, not up a ladder.
-
Snap the insert into the plate from the back, the same way a network keystone jack goes in. It latches in one orientation. Rotate the plate, not the insert, if the tilt is going the wrong way.
-
Route the cable out through the slot, plug the short right-angle cable into the long one behind the plate, and bring the right-angle end out through the 7.5 mm slot below the magnet.
-
Screw the plate to the bracket with the two #6-32 wall plate screws, then push the surplus cable back into the cavity so only the working end shows.
-
Stick the steel plate to the tablet. Clean the back of the tablet with alcohol first, then position it by eye against the magnet before you commit the adhesive — landscape or portrait, that is the decision you are making. Give the 3M adhesive an hour before you hang anything on it.
The bezel variant
vizio_xr6m10_bezel_1_gang.stl and vizio_xr6m10_bezel_2_gang.stl are a
different animal: a full surround that the tablet drops into, 195 mm tall and
25.55 mm deep, 95 mm wide for the 1-gang and 161.79 mm for the 2-gang.
I drew them helping my parents replace the Crestron CT-1000 touch panels wired into their house. The old panels came out, a dual-gang bracket went into the existing CT-1000 housing, and ancient VIZIO XR6M10 tablets went in behind the bezel. Power came off the existing low-voltage supply through a 12 V to 5 V USB step-down, which is the cheapest way to turn a legacy control-system rail into something a tablet will charge from.
These are cut to one specific tablet, which no one is buying in 2026. If you
have a different one, open vizio_xr6m10_bezel_1_gang.step in cad/ and change
the pocket — that is what the STEP export is there for.
Troubleshooting
The tablet slides down the wall. Rectangular steel plate, not round, and get it centred on the magnet. A round plate the size of a coin gives the magnet a tiny contact patch and gravity wins over a few days.
The tablet does not sit flat. The charging plug is fouling. That is what the right-angle cable is for, and the plug wants to point along the tablet’s edge, not out from it.
It charges slowly or not at all. A 16 ft flat USB cable inside a wall is a long thin conductor, and a tablet lit up all day draws real current. Move up to the in-wall USB receptacle so the long run is mains and the USB run is short.
The magnet marks the tablet. You have a bare magnet, not a rubber-coated one. Do not sand it — replace it.
Dashboard setup
The tablets run the Home Assistant app and open straight onto a dashboard. For the idle state I use the Google Photos integration and WallPanel, which turns the tablet into a photo frame between uses — which is what stops a wall tablet reading as a gadget bolted to the hallway and starts it reading as part of the house.
Files and downloads
Both plates, the jack insert and both bezels have a STEP export in cad/, so
remix them for your tablet rather than living with mine. The four plain keystone
inserts are STL only — they are simple enough to redraw in ten minutes.
Printable parts
- 0_degree_keystone.stl
- 10_degree_keystone.stl
- 15_degree_keystone.stl
- 20_degree_keystone.stl
- 20_degree_keystone_jack.stl
- keystone_plate_1_gang.stl
- keystone_plate_2_gang.stl
- vizio_xr6m10_bezel_1_gang.stl
- vizio_xr6m10_bezel_2_gang.stl
CAD source
The design itself, if you want to change it rather than print it. A STEP file is exact geometry and opens in almost anything; a Fusion 360 archive keeps the modelling history, so you can go back and edit the sketch that made the part.
- 20_degree_keystone_jack.stepSTEP — opens in Fusion 360, FreeCAD, Onshape, SolidWorks
- keystone_plate_1_gang.stepSTEP — opens in Fusion 360, FreeCAD, Onshape, SolidWorks
- keystone_plate_2_gang.stepSTEP — opens in Fusion 360, FreeCAD, Onshape, SolidWorks
- vizio_xr6m10_bezel_1_gang.stepSTEP — opens in Fusion 360, FreeCAD, Onshape, SolidWorks
- vizio_xr6m10_bezel_2_gang.stepSTEP — opens in Fusion 360, FreeCAD, Onshape, SolidWorks